2. Tutorial
Welcome to the Vesper tutorial! In this tutorial, you will create a new Vesper archive (don’t worry if you don’t know that that is: we’ll explain in a moment), import an audio recording into it, and process the recording to find and classify some bird calls that are in it. The tutorial will introduce several Vesper concepts (like what an archive is) as needed, with just enough explanation for the tutorial to make sense. The concepts will be explained in more detail in other parts of the documentation.
2.1. Background
Before we begin the tutorial proper, this section will provide a little background about Vesper: how the Vesper application is structured, the kinds of data (audio and other) that it processes, and the kinds of processing that it can perform.
Vesper is a web application, and as such comprises two main components, a server and a client. The server provides access to a collection of data called a Vesper archive (or just archive for short) to one or more clients, and performs operations on the data on behalf of the clients. As a picture, this application architecture looks like this:

The architecture of the Vesper web application.
The server typically runs on the computer that holds the archive. Each client runs in a web browser, either on the same computer as the server or on a different one. In this tutorial, we will run the server and a single client on the same computer.
A Vesper archive is a collection of audio recordings and related metadata. Each archive has its own directory on disk, called the archive directory. The archive directory always contains certain essential parts of an archive, and in many cases the entirety of the archive. One such part of the archive is a relational database called the archive database, which holds most of the metadata of the archive.
Vesper supports various operations on archive data. The operations that you will perform in this tutorial fall into four broad and common categories. These categories are illustrated in the following figure:

Four common types of operations on Vesper archive data.
An import operation imports audio recordings and/or related metadata into an archive from an external source. For example, in this tutorial you’ll exercise two different kinds of import operations, one for audio recordings and another for metadata pertaining to them.
A view operation creates some sort of graphical representation of data for you to view and in some cases interact with, for example a spectrogram or a chart.
A process operation processes data, for example by running an automatic detector or classifier, or by classifying a set of short audio clips according to a key that you type on your keyboard.
Finally, an export operation exports data from an archive to an external destination. For example, in this tutorial you’ll export detected bird calls from your archive as audio files.
2.2. Getting started
Now that you’re somewhat oriented to the Vesper web application and Vesper archives, let’s get started with the actual tutorial! In this first part of the tutorial, you will create a new Vesper archive, add a user to it, start a Vesper server to serve the archive, and run the Vesper client in a web browser to view the archive.
2.2.1. Create a new Vesper archive
- Download the Vesper archive template to your computer.
- Unzip the downloaded file. This should create an archive directory
called
Archive Templatecontaining several files and directories. - Rename the archive directory whatever you want. In the following we
will assume the name
Tutorial Archive. - Move the directory wherever you want. For example, you might put it on your desktop or in a different directory that you reserve just for your Vesper archives.
2.2.2. Add a user to the archive
Open a Windows Anaconda Prompt or Unix terminal and activate your Vesper conda environment with a command like:
conda activate vesper-x.y.z
but with “vesper-x.y.z” replaced with the name of your Vesper environment. See the Installation section of this documentation for more about installation and conda environments.
In your Anaconda Prompt or terminal, change the current working directory to your archive directory by issuing an appropriate
cdcommand. For example, if you’re on Windows and you put your archive inC:\Users\Nora\Desktop\Tutorial Archive, the command is:cd "C:\Users\Nora\Desktop\Tutorial Archive"
The analogous command for macOS or Linux is:
cd "/Users/Nora/Desktop/Tutorial Archive"
Note that if the name of your archive contains spaces you must enclose the directory path in double quotes in the command.
Vesper keeps track of who makes what changes in an archive via the notion of a user. You can add any number of users to an archive, and you must log in as one of those users to be able to modify the archive. Every archive should have at least one superuser, a user with certain administrative privileges. Add a superuser to your archive with the command:
vesper_admin createsuperuser
The command will prompt you for the superuser’s name, email address, and password (twice). You can skip the email address if you wish. Do not use a password that you want to keep secret. Communication between the Vesper client and server is currently unencrypted, so it is possible for someone eavesdropping on your client/server network traffic to see your password.
Note
In some Vesper installations (such as ones including Python 3.10.11
and Django 4.2) the vesper_admin createsuperuser command will
create the desired superuser but not terminate. If the command seems
to hang, producing no output for at least thirty seconds, type
Ctrl-C on your keyboard (you may have to do this several times
on Windows) to terminate it.
2.2.3. Start the Vesper server
If you’re using Windows, issue the following command in an Anaconda Prompt in which you’ve set the current working directory to the archive directory (for example, the Anacona Prompt of the last section):
python -m vesper.django.manage runserver
Or, if you’re using macOS or Linux, issue the following command in a terminal:
vesper_admin runserver
Some output from the server should appear, indicating that the server started.
2.2.4. View the archive
To run a Vesper client to view the archive:
Start the Chrome web browser. We strongly recommend using Chrome over any other web browser since Vesper is tested and used most extensively with it.
Go to the URL:
localhost:8000
This should produce a page that looks something like this:

An empty Vesper archive.
Congratulations: you’ve created, served, and viewed your very own Vesper archive! It doesn’t contain any data yet, but you’ll remedy that soon.
2.3. Archive data
As mentioned above, A Vesper archive is a collection of audio recordings and related metadata. In this section we will explain in a little more detail what that means, describing the main types of data in an archive and how they relate to each other.
2.3.1. Recordings, clips, annotations, and tags
First and most importantly, a recording is a continuous audio recording. A recording has one or more channels, each of which comprises a sequence of numbers called samples. Each sample represents an (almost) instantaneous air pressure measurement made with the aid of a microphone. In multichannel recordings (that is, recordings with more than one channel), the samples of different channels are most often recorded using different microphones.
The following figure illustrates the relationship between a recording, its channels, and their samples:

A stereo recording, with two channels and their samples. The horizontal axis represents time, and each small blue box represents one sample. Note that the figure is only schematic, and that real recordings typically contain orders of magnitude more samples than shown.
The samples of a recording are collected at a fixed rate called the sample rate. The most common sample rates used for audio recording are in the tens of kilohertz. That is, samples are collected tens of thousands of times per second.
All of the channels of a recording have the same number of samples, and the corresponding samples of different channels (that is, corresponding in the sense that each sample has the same position in its channel’s sample sequence) are collected at the same instant.
In addition to samples, a recording includes metadata that provide information about the recording (hence the “meta” prefix). For example, the metadata include a recording’s start time and sample rate.
Aside from recordings, all of the other data in an archive help to describe the contents of the recordings, and hence are also metadata. In the remainder of this section, we will list and describe several types of such metadata.
A clip is a continuous portion of one recording channel. A clip is typically much shorter than the recording that contains it, and it typically contains a single acoustic event of interest, such as a bird call. The following figure illustrates the relationship between a recording and some clips within it:

A stereo recording and some clips within it. The horizontal dimension represents time, and each small blue box represents one sample. Note that the figure is only schematic, and that real recordings and clips typically contain orders of magnitude more samples than shown.
Note that, as shown in the figure, different clips may have different durations, and each clip is confined to a single recording channel.
An annotation provides one piece of information about a particular clip, and has a name and a value. A classification is an annotation that classifies the contents of a clip. For example, classification annotation might have the name “Classification” and a value like “Call” or “Noise”.
A tag marks a clip as belonging to a set of clips. A tag has a name that can be used to refer to the set. For example, you might use a tag named “Review” to mark clips that you want to review with a collaborator, and a tag named “Export” to mark clips for which you want to export audio files.
2.3.2. Stations and devices
A monitoring station is a location where recordings are made, with a name and a fixed latitude, longitude, and elevation. A station also has recording devices associated with it, as described below.
A recording device is a piece of recording hardware, either an audio recorder (for example, an autonomous recording unit, a manually-operated field recorder, or a general-purpose computer with audio recording capabilities) or a microphone. When you build an archive, you tell Vesper what devices you used to create the recordings of the archive, including which devices were used at which stations during which time periods, and which microphones were connected to which recorder inputs during which time periods. From this information Vesper infers which microphone was used to record each channel of each recording. This allows Vesper to support various useful archive queries, for example to retrieve for display all of the clips with a particular classification that were made with a particular microphone at a particular station on a particular night.
2.3.3. Processors
A processor is software that processes existing data to create new data. Vesper currently offers two types of processors: detectors and annotators. A detector processes each of the channels of one or more recordings to create clips, for example to mark portions of recordings that contain bird calls. An annotator processes clips to create annotations. For example, a classifier is a common type of annotator that creates annotations that classify the contents of clips.
2.3.4. Summary
There are many kinds of archive data. For quick reference, here’s a table summarizing those described above:
| Data | Description |
|---|---|
| Recording | Continuous audio recording with one or more channels. |
| Channel | One channel of a recording, a sequence of samples. |
| Sample | Number representing an instantaneous air pressure measurement. |
| Clip | Continuous portion of one recording channel. |
| Annotation | One piece of information about a clip, with a name and a value. |
| Classification | Annotation that classifies a clip. |
| Tag | Name for a set of clips. |
| Station | A named monitoring location. |
| Device | Hardware recording device, either a recorder or a microphone. |
| Recorder | Device that records audio, creating recordings. |
| Microphone | Device that provides audio input to a recorder. |
| Processor | Software data processor, either a detector or an annotator. |
| Detector | Processor that creates clips from recordings. |
| Annotator | Processor that creates annotations for clips. |
| Classifier | Annotator that creates classifications. |
2.4. Importing data
In this section of the tutorial, you will import a recording into your Vesper archive. Before you can do that, however, you must import some metadata that will allow Vesper to infer certain information about the recording, such as the station at which it was made and the microphone(s) that were used to make it. The availability of such metadata simplifies recording imports, and also helps Vesper to support powerful queries and data displays. Along with the metadata required for recording imports, you will also import metadata describing processors and annotations that Vesper will use when you work with your recording in the next section of the tutorial.
2.4.1. Import metadata
Vesper imports most metadata from text files that are in the YAML format. You can import metadata of various types from YAML files, including descriptions of stations, devices, processors, and annotations.
The archive template comes with several example YAML files in
the Metadata YAML subdirectory of the archive directory.
One of the files is named One Station.yaml and contains
metadata for a monitoring setup with only one station. The
metadata in this file will serve as the basis for your
archive.
Note
Another of the files in the Metadata YAML directory is
named Two Stations.yaml and describes a small monitoring
network with two stations. We will not use that file in this
tutorial, but it is provided as an example of how to specify
metadata for more than one station.
To import metadata into your archive:
Make sure you have a Vesper server running in your archive directory, and point your browser to the archive. As at the end of the Getting started section, you should see a page much like this:
An empty Vesper archive.
The black bar near the top of the window is called the Vesper navbar (short for navigation bar), and the user interface elements with the little triangles at their right ends (named
File,Edit, etc.) are called dropdowns.Select
File->Import metadata(that is, theImport metadataitem within theFiledropdown). This should take you to a login page, as shown in the following figure: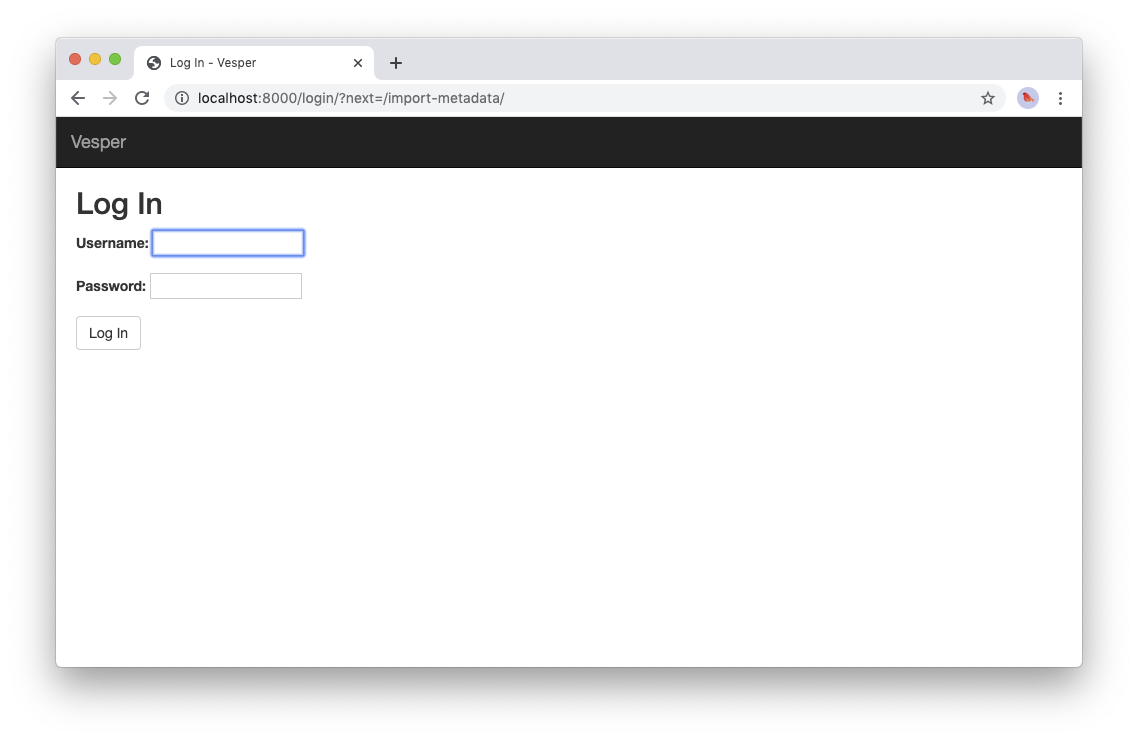
The login page.
Vesper requires that you be logged in as a specific user whenever you modify an archive, so it can keep track of who made the modifications. Enter the user name and password for the superuser you created in the Create a new Vesper archive section above, and press the
Log inbutton. This should take you to a page that looks like this: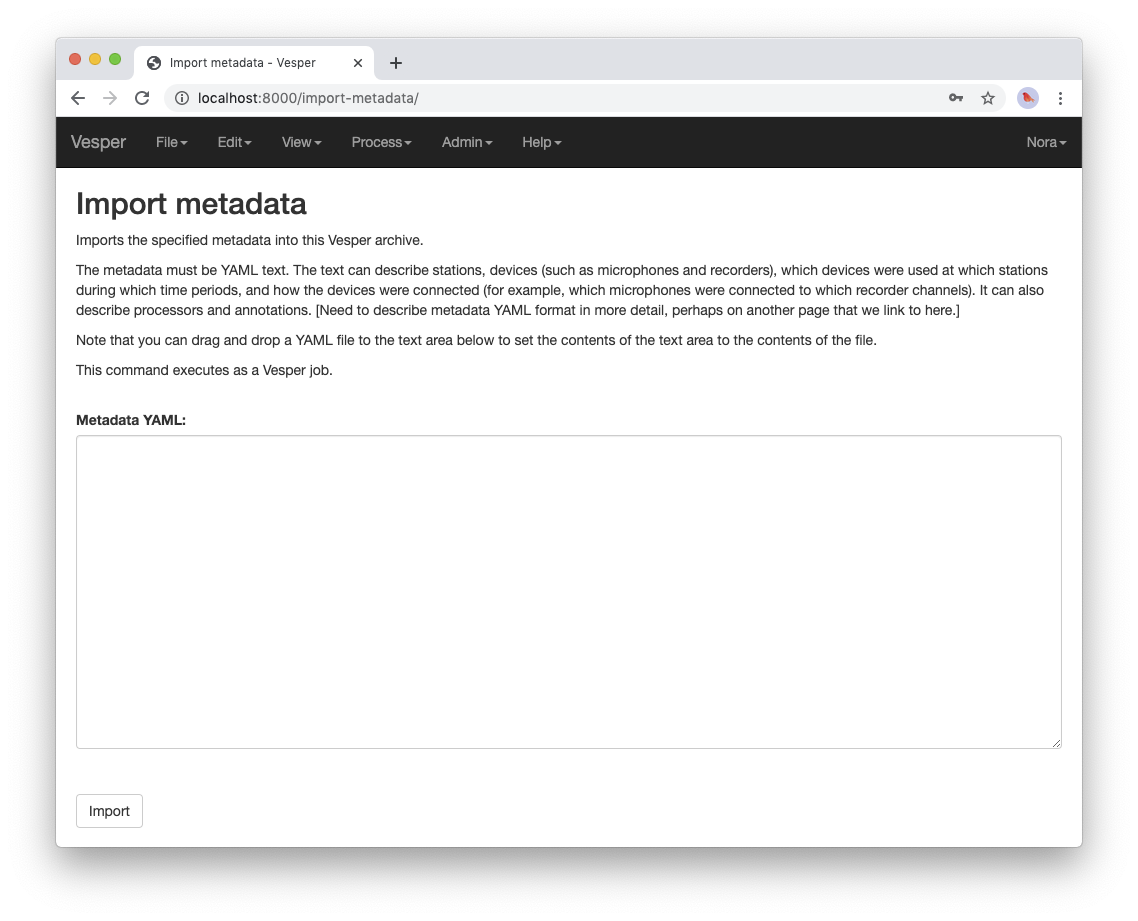
The
Import metadatapage.From a Windows Explorer or macOS Finder window, drag the
One Station.yamlfile and drop it onto theMetadata YAMLtext area on theImport metadatapage. The contents of the file should appear in the text area, as shown in the following figure: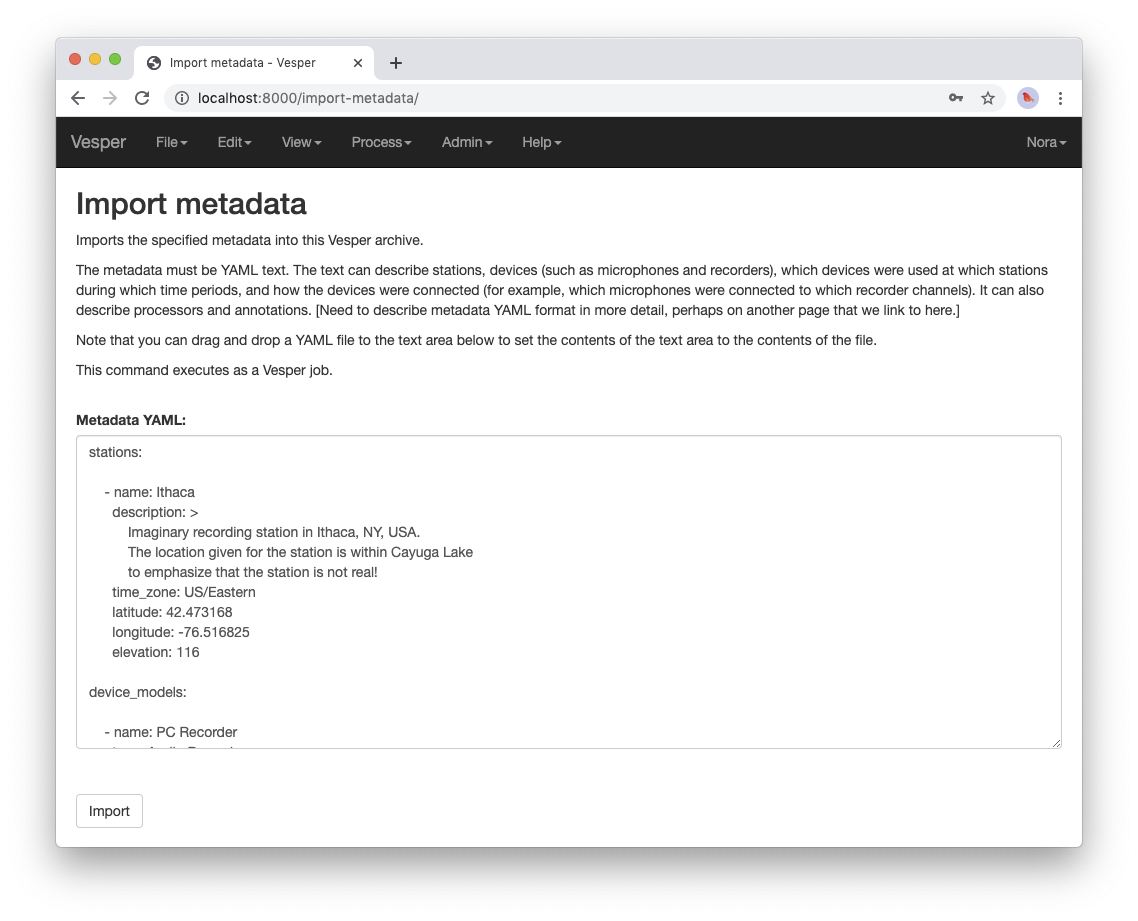
The
Import metadatapage, including metadata.Look through the contents if you wish to see how they describe the station, devices, detectors, classifiers, annotations, etc. that you will add to your archive. Finally, press the
Importbutton to import the data.When you press the
Importbutton, the Vesper client creates a textual command that describes the import operation you want to perform, including a copy of the text that you dropped onto the text area, and sends the command to the Vesper server for it to run. The server runs the command as a Vesper job and directs the client to a job page that provides information about the status of the job.Note
While strictly speaking there is a difference between a command, which is a textual description of an operation, and the execution of that command as a job, the distinction is sometimes not important. In such situations we may ignore the distinction and speak of the command as an active entity, saying things like “the command imports data into the archive database”, even though the active entity is really a job and not a command. We will be careful to make the distinction when it is important.
The job page for your
Import metadatacommand will initially look something like the following:
A job page for an unstarted job.
Note that the status of the job is “Unstarted”, indicating that when the page was sent from the server to the client the job had not yet started running.
You can refresh a job page in your browser to monitor the progress of the job. In Chrome, for example, you can do this by pressing the small circular arrow button just to the left of the address bar. (Yes, it’s a little clunky for you to have to refresh the page yourself. A future version of Vesper will update job pages automatically to display progress.) While a job is running, its status is displayed as “Running”, and when a job completes, its status changes to “Completed”. For example, after the job pictured above completed its job page looked like this:
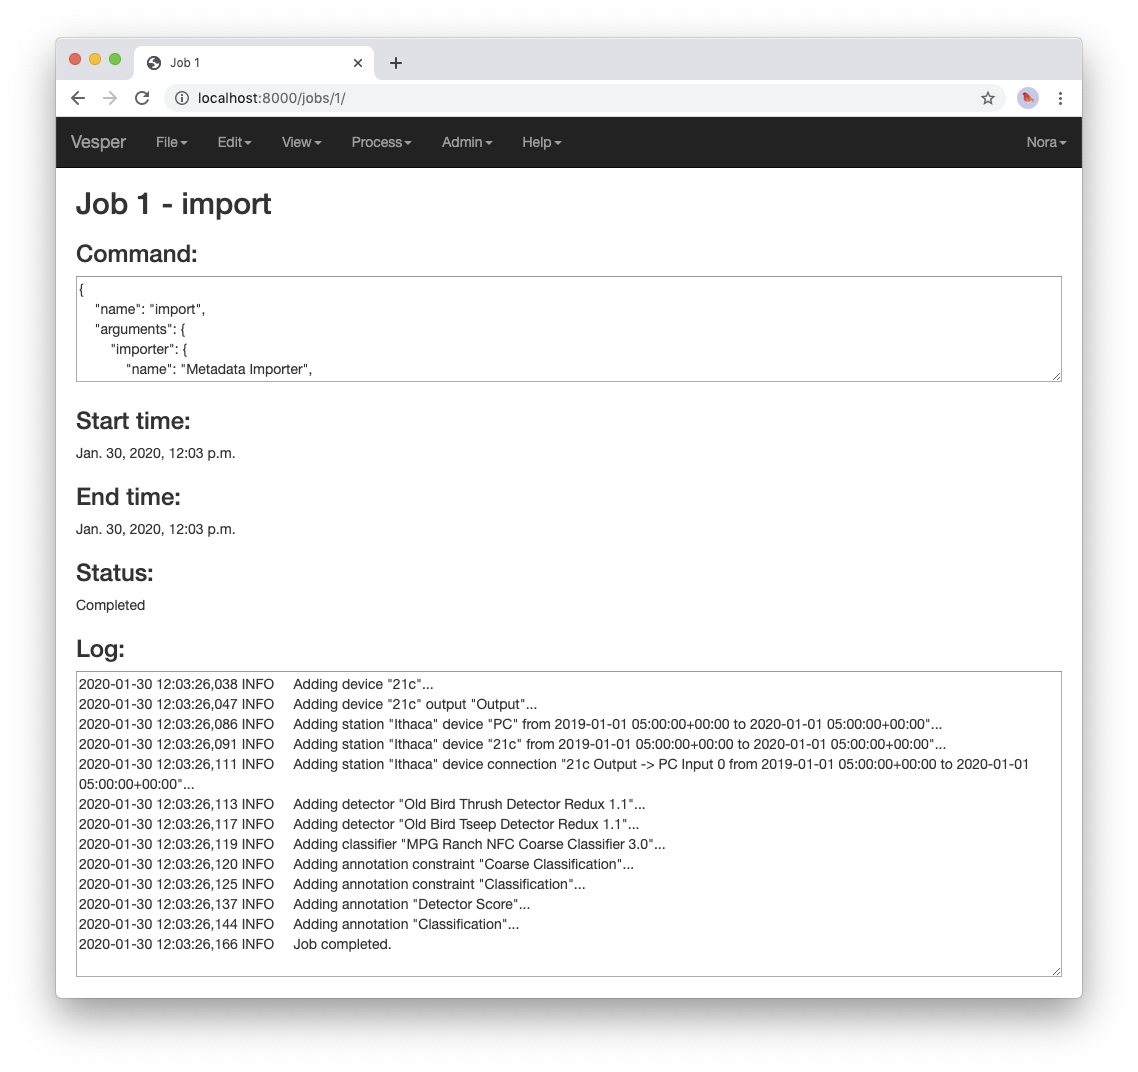
A job page for a completed job.
Every job has a log to which it writes messages as it runs to document its progress. The log of a job is displayed at the bottom of the job page. In the log pictured above, note the messages that indicate the various objects that the job added to the archive.
Jobs sometimes fail to complete, for example if information required for the job is unavailable or because of a software bug. In such cases, the status of the job changes to “Failed”, indicating that the job failed due to an error. For example, if you run the import command you ran above a second time it fails, as shown in the resulting job page:
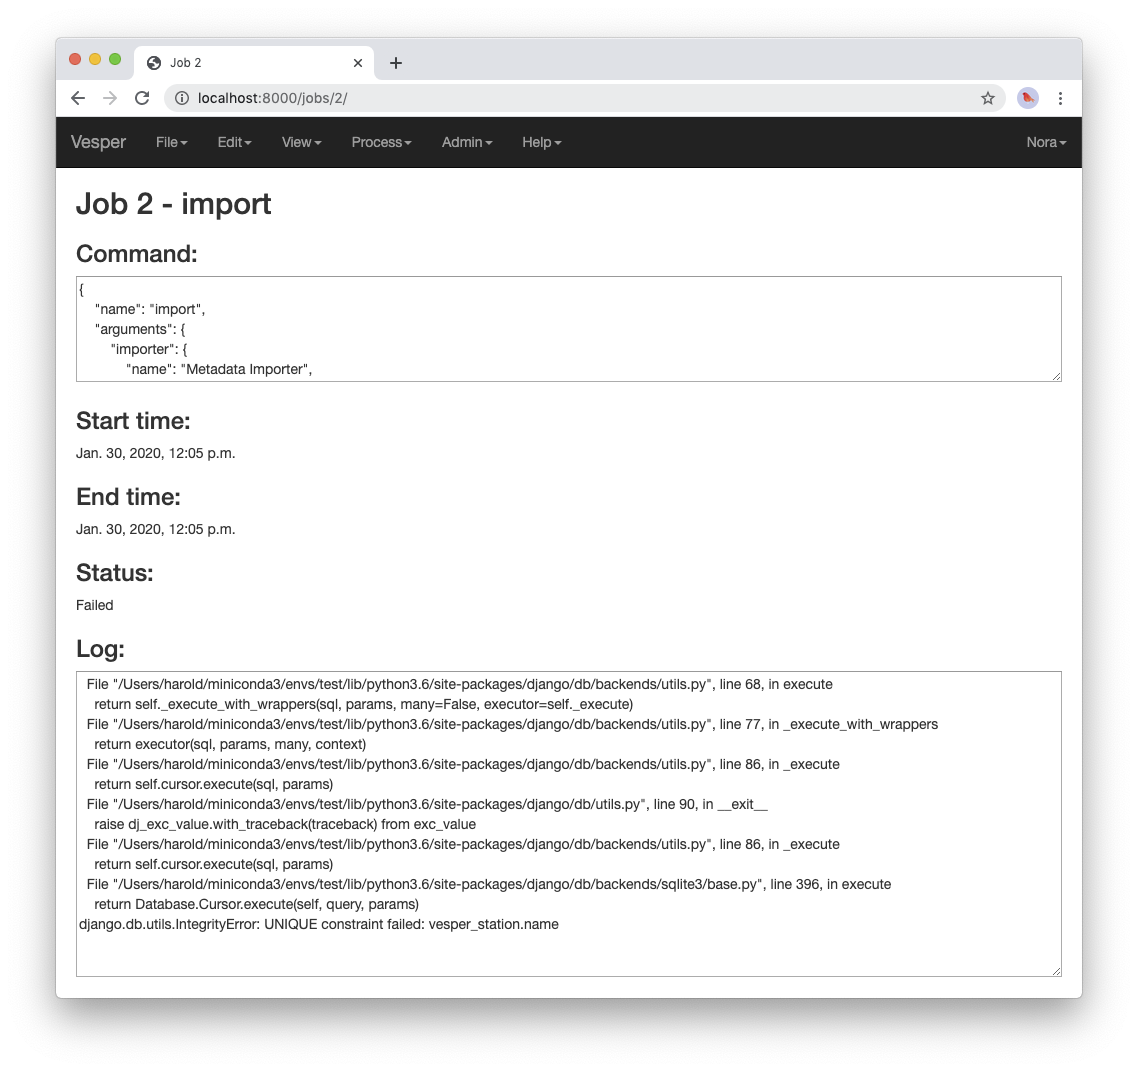
A job page for a failed job.
The job fails because it attempts to create a new station whose name is the same as that of an existing station. That’s not allowed, however: Vesper requires that the names of stations be unique. When a job fails, it usually raises an exception that includes information about the failure. The log for the failed job includes this information in the form of one or more error messages and a stack trace indicating exactly what parts of Vesper were running when the failure occurred. The portion of the log visible in the above figure shows the tail end of the stack trace, and the final line of the log indicates that the job failed because it violated a database uniqueness constraint concerning the station name. Both the error messages and the stack trace are useful for diagnosing why a job failed, so that you can, say, fix a problem with your command or archive if that caused the failure, or report a problem with Vesper.
An earlier message in the log that is not visible in the figure (if you run the command yourself, you can scroll up in the log to see it) indicates that because the command failed, the archive database was restored to its state before the import. This is an important property of Vesper jobs that import metadata or recordings: when such a job fails, it leaves the archive database exactly as it was before the job started, preserving the integrity of the database and allowing you to resume work from the point just before you ran the failed job.
Go to the URL:
localhost:8000
Previously, when you visited this URL, you saw a page that indicated that your archive was empty. Now, however, you see something slightly different, because of your metadata import:
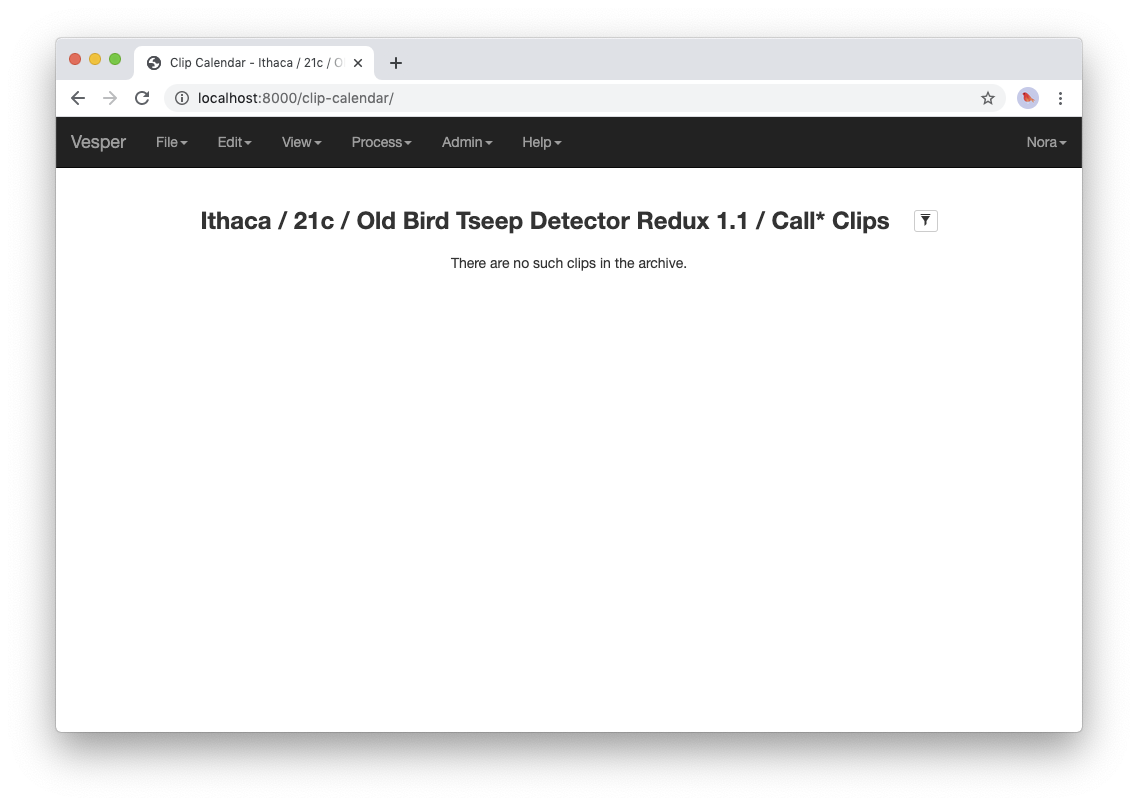
An empty clip calendar.
This page displays a clip calendar for the station and microphone whose metadata you imported in the last step. That’s progress over a message about a totally empty archive, but it’s still not very interesting since, as the message in the calendar reflects, the archive does not yet contain any clips. Next, though, you’ll import a recording and run some automatic detectors on it to create some clips to look at. You’ll learn more about the contents and use of the clip calendar then.
2.4.2. Import a recording
Now you’re ready to import some actual audio data into your Vesper archive! For the purpose of this tutorial, the Vesper project provides a short recording for you to import, but of course when you create your own archive you can import your own recordings into it.
To import a recording into your archive:
Download the recording file for this tutorial and put it in the
Recordingssubdirectory of your archive.Select
File->Import recordings. This should take you to a page that looks like this:
The
Import recordingspage.A Vesper archive stores metadata for each recording in the archive database, and audio data in one or more .wav audio files. All of the audio files are located in file system directories designated as the archive’s recording directories. By default, an archive has a single recording directory, the
Recordingssubdirectory of the archive directory. The path of this directory for your archive should appear in theFile and/or directory pathstext area on theImport recordingspage. We will use this default recording directory for the archive of this tutorial.Note
If you want to store the audio data of an archive’s recordings in one or more directories other than the default recording directory, you can explicitly list the recording directories in the
recording_directoriessetting of theArchive Settings.yamlfile of the archive directory. This feature provides a lot of flexibility regarding where you can store your recordings’ audio files. For example, you can store them outside of the archive directory, and even across multiple disks. You can read more about such possibilities in the exampleArchive Settings.yamlfile provided with the archive template.Press the
Importbutton at the bottom of theImport recordingspage to import your recording into the archive. This should take you to a job page that (after the job completes) looks like this: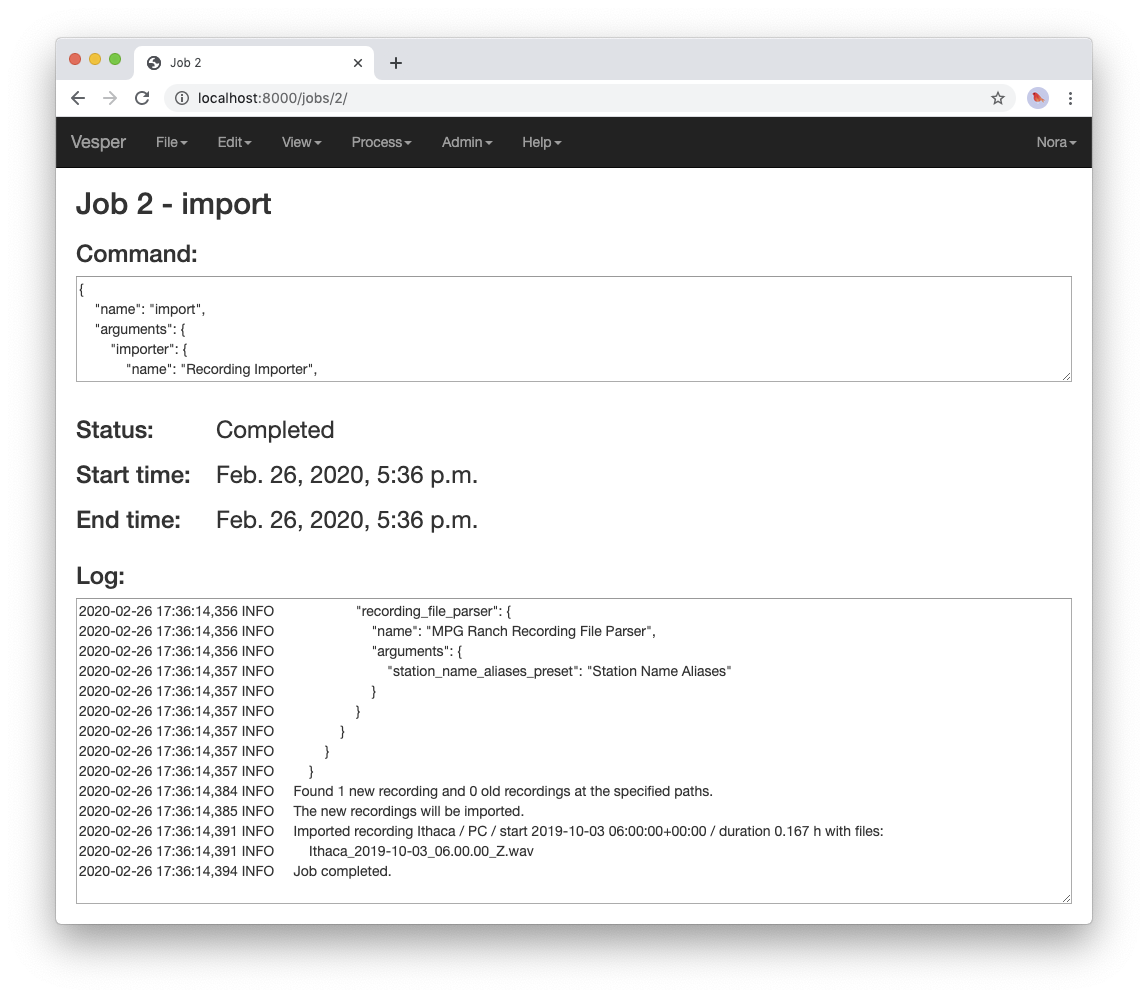
Import recordingsjob page.The log indicates that one recording file was imported into your archive from the archive directory.
When an
Import recordingscommand imports a recording, it adds metadata for the recording to the archive database. The metadata include the station at which the recording was made, the number of channels of the recording, the microphone used to record each channel, and the locations on disk of the recording’s audio files. The metadata are derived from the names and contents of the audio files as well as from other metadata already in the database, such as the metadata you imported with theImport metadatacommand.When you run an
Import recordingscommand, it analyzes the audio files in your archive’s recording directories to determine which have already been imported and which are new, and imports only the new ones. Thus you can run the command any number of times for an archive to import new recordings as they become available. For example, during a migration season you might run the command once each morning to import the previous night’s recording.Note that the
Import recordingscommand does not move or copy the audio files of the recordings it imports: it leaves the files where they are, and simply notes their locations in the archive database. So do not delete the files after import: if you do and you don’t have copies of the files elsewhere you will have lost them!Note
The name of a recording file must be in one of several formats for Vesper to be able to parse certain metadata from it. These metadata include the name of the station at which the file was recorded and the file’s start time. For example, the name of the recording file you imported in this section was:
Ithaca_2019-10-03_06.00.00_Z.wav
which specifies that the file was recorded at the Ithaca station beginning at 6:00 am on October 3, 2019 UTC time. The “Z” towards the end of the file name indicates that the time is UTC.
We recommend using UTC times in your recording file names, explicitly marked as such as in the example above. UTC times take some getting used to, but since they conform to an international standard they will be clearly interpretable all over the world for many years to come. If you use them you will necessarily avoid various possible pitfalls of local times, giving your recordings greater value, especially in the long term.
That said, Vesper can parse some files names that specify local start times. For example, it can parse a name like:
Ithaca_20191003_020000.wav
Since this file name is not explicitly specified as a UTC time (currently the only way to do that is with a name like the other example above, with the dashes in the dates and the dots in the times), Vesper assumes that it is a local time. It uses the time zone of the recording’s station to convert that local time to the equivalent UTC time, since Vesper uses only UTC time internally. In this case, the Ithaca station is in the US/Eastern time zone, which was four hours behind UTC on the night of the recording. Thus the UTC start time for this file is 6:00 am on October 3, 2019 UTC time, the same as that specified by the first file name above.
If needed, you can specify station name aliases for use in recording file names. For example, if your recording files use “ITH” as an abbreviation for the Ithaca station, an appropriate station name alias would enable you to import files with names like:
ITH_2019-10-03_06.00.00_Z.wav
Station name aliases are specified via the
Station Name Aliasespreset, in the filePresets/Station Name Aliases/Station Name Aliases.yamlin your archive directory. See the example preset in the archive template for more documentation regarding this feature.Select
View->View clip calendar, which should take you to a page like the following: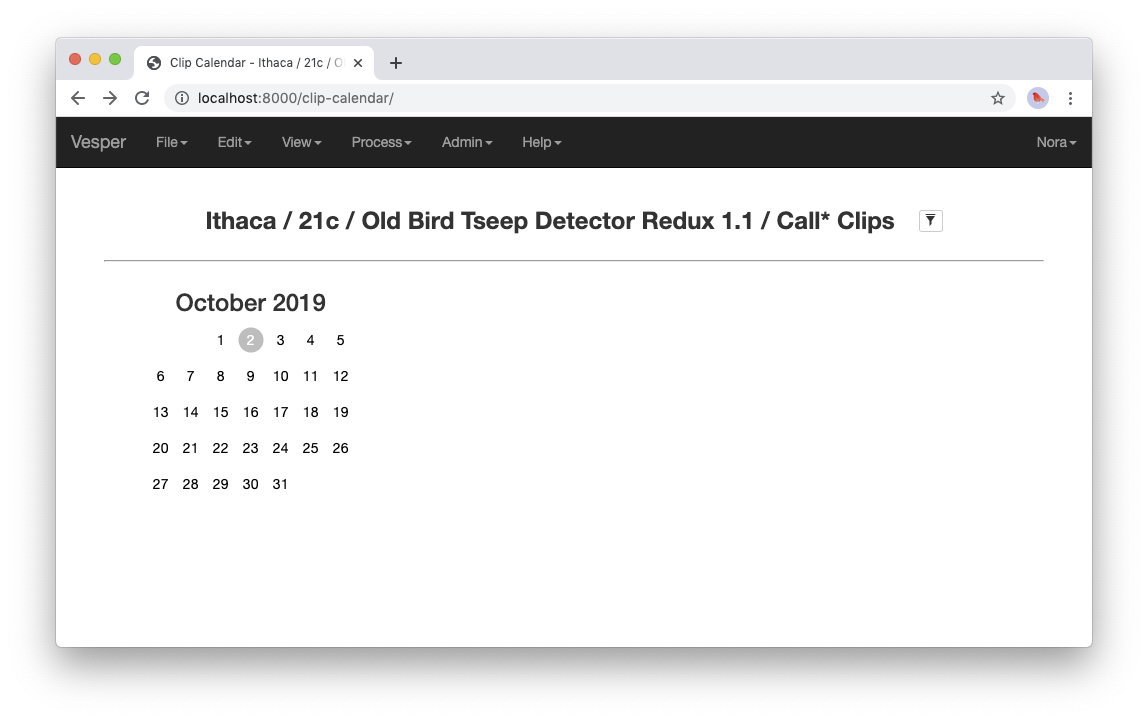
A nonempty clip calendar.
Now that there’s a recording in your archive, the clip calendar looks more like an actual calendar. The gray bubble on the October 2 date indicates that the archive contains a recording for that date (the one you just imported), but the gray color indicates that there are no clips for that recording. In the next section of the tutorial you will create some clips by running a detector on your recording.